![]()
The number of video editing apps that can be used on iPhone/iPad is increasing. Even tech giant Apple cannot ignore the importance of video editing apps. And Apple has released a free video editing app called the Clips app. With the Clips app, you can create MOV videos mainly from recordings and selfies, or with videos and photos in your library, adding effects such as filters, live titles, text, emojis, and stickers. You can save it to your iPhone/iPad library or use it for YouTube or other video editing apps. To use the Clips app, you need to upgrade your iPhone/iPad to iOS 13 or later. Clips app is not available on Android devices.
Many users use the Spotify app on their iPhone, iPad or iPod Touch. A lot of them want to add Spotify songs as background music to the Clips app. However, the Clips app cannot load songs from the Spotify app. To add Spotify songs as background music to Clips app, you need to use TuneKeep Spotify Music Converter on your computer to convert Spotify songs to MP3, M4A, WAV, etc. and then transfer them to iPhone/iPad.
How to Create a Video with Background Music Using Clips App
The Clips app isn't a professional video editing app, but it's easy-to-use and even beginners can quickly create videos, which makes it become a quite popular video editing app for iPhone, iPad or iPod Touch users.
Launch Clips app on your iPhone/iPad, you will see a red record button at the bottom of the screen. If you press and hold the button, you can record, take a selfie, or use a video as input material. You can switch between recording and selfie with the tap of the small circle button. Wipe the record button to the small lock button above to continue recording without pressing and holding. If you want to stop recording/selfie, tap somewhere on the screen. The recorded/selfie video will now appear in the timeline at the bottom of the screen.

There are several buttons around the record/selfie button. The project button is in the upper left, the aspect ratio and music are in the upper right, the play button is in the lower left, and the create button is in the lower right. Also, the left and right of the record button are the library button and the effect button. All the functionality of the Clips app can be easily achieved with these buttons.
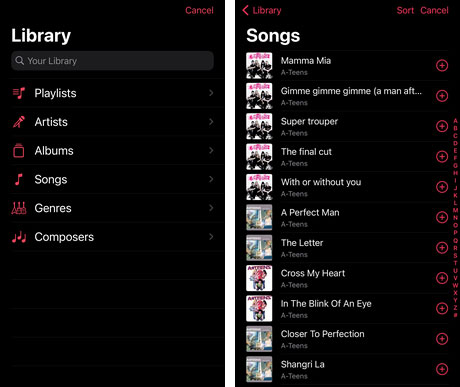
The project button is used to load or create a new project. The aspect ratio buttons are used to select 16: 9, 4: 3 and square aspect ratios. For music buttons, select a song from the music library of the iPhone/iPad music app, or select a sound effect provided by Apple. However, the music library displayed in the Clips app does not display or load Apple's own Apple Music songs, let alone the music on the external Spotify app. In addition, Spotify Premium's encrypted Ogg format is not compatible with iPhone/iPad music app. As to how to add Spotify songs as background music to clips app will be introduced later.
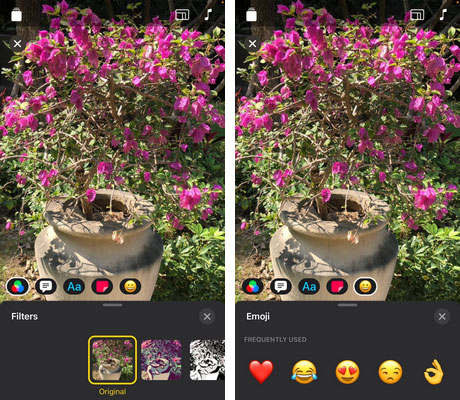
After adding music to the recording/selfie, return to the main screen and tap the library button to add more photos and videos in the Photos app to the Clips app timeline. If necessary, you can change the music again after adding new material. The rest is adding and adjusting effects. Tap the effect button to display five tabs: Filters, Live Titles, Text, Stickers and Emoji. Filters, Emoji and Stickers can be applied directly. For Live Titles, "Speak while recording to add text" is displayed and you need to speak during recording. In Text tab, you can select styles and edit characters. The image below is a screen of Filters and Emoji.
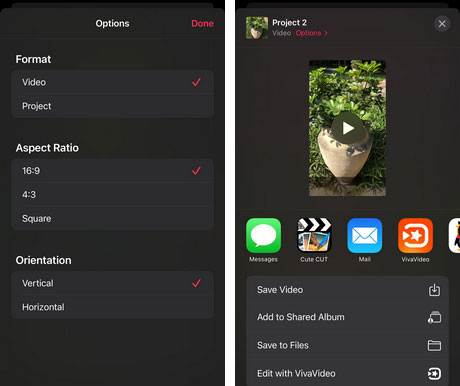
After editing is complete, you can preview by tapping the play button on the main screen. If there is no problem, you can tap the create button to save it as a MOV video on your iPhone/iPad, upload it to YouTube and share it, or use it as a material for other video editing apps. Before creating, you can tap options to set the format (video, project), aspect ratio and orientation (vertical & horizontal), etc. You can change the name of the project later.
The Clips app has no complicated settings and you can create videos from recordings, selfies or music with just a few taps. However, if you are using the Spotify app on your iPhone/iPad, it is not possible to add Spotify songs to the Clips app. The solution is TuneKeep Spotify music converter.
TuneKeep Spotify Music Converter: Best Spotify to MP3/M4A Converter
With TuneKeep Spotify Music Converter, you can easily convert Spotify songs, albums and playlists to all-purpose MP3, M4A, WAV, etc. on Windows and macOS, regardless of Spotify Free or Spotify Premium you are using. Then you can transfer the output MP3, M4A, WAV files to the music library of iPhone/iPad and you can add it as background music in Clips app.
TuneKeep Spotify Music Converter Amazing Features
- Convert Spotify songs, albums and playlists to MP3, M4A, WAV, FLAC, etc.
- Convert Spotify music regardless of Spotify Free or Spotify Premium
- Skip advertisements automatically when using Spotify Free
- Keep ID3 tags like song title, artist, album, artwork, etc.
- Rename output files by song title, artist, album, hyphen, space, etc.
- Sort output files into folders by album, artist or artist/album
- Support converting while playing when using Windows version
- Fully compatible with latest Windows, macOS and Spotify application
Convert Spotify Songs to MP3/M4A, Transfer to iPhone/iPad and Use in Clips App
TuneKeep Spotify music converter is intuitive and easy-to-use. With just a few clicks, you can convert Spotify songs to MP3, M4A, WAV files which you can transfer to Music app on iPhone/iPad and use in your Clips app. Please check the guide below for details.
Step 1: Launch Spotify Music Converter
Launch TuneKeep Spotify Music Converter and Spotify app will be automatically launched as well. Please do not operate Spotify during the conversion or do not close Spotify until the conversion is complete.
Step 2: Add Spotify Music
To add Spotify songs, albums or playlists to Spotify Music Converter, you can use either drag & drop or link copy & paste.
Drag & drop: You can display both Spotify and TuneKeep Spotify Music Converter on the screen at the same time, and drag and drop your favorite songs, playlists or albums from Spotify to the software interface of TuneKeep Spotify Music Converter.
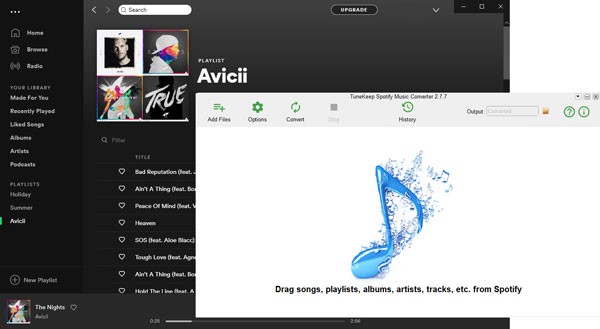
Link copy & paste: Right click on a song, a playlist or an album on Spotify and go to "Share" menu, then get the link by clicking "Copy Song Link", "Copy Playlist Link" or "Copy Album Link". After that, click the "Add" button in the interface of TuneKeep Spotify Music Converter, paste the copied link into the input box at the bottom left, and click add button to add the songs to conversion list.

No matter which way you use, all the songs in the album or playlist will be detected and listed in checked status. You can repeat the operation to add multiple songs, albums or playlists. Untick the checkboxes of the songs you don't want to convert. After selecting the songs, click Add button to add the checked songs to conversion list.
Step 3: Choose MP3/M4A Format
TuneKeep Spotify Music Converter provides MP3, M4A, WAV, FLAC, etc. as output formats. And the formats which can be added to Music app on iPhone/iPad and use in Clips app are MP3, M4A and WAV. Here we recommend you use default 320kbps MP3 or use 256kbps M4A. Considering 160kbps Ogg of Spotify Free or 320kbps Ogg of Spotify Premium, WAV format with large file size is not recommended.
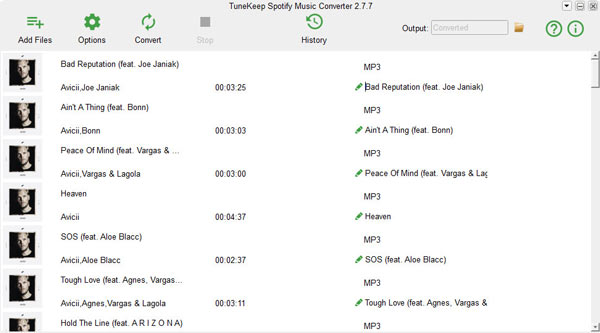
If necessary, you can click Options button to change output folder, set the method of renaming and sorting output files.
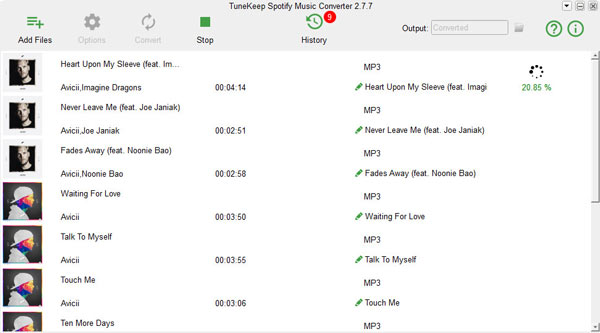
Step 4: Start Spotify Music Conversion
Now you can simply click "Convert" button to start Spotify music conversion. Click History button to find the converted songs and click the little icon folder to open output folder and locate the output files.
Step 5: Add Output Files to iTunes or Music App
For Windows or macOS up to Mojave 10.14.6, launch iTunes and click menu "File" > "Add File to library" to browse the output folder of Spotify Music Converter, select the output files and add them to your iTunes library.
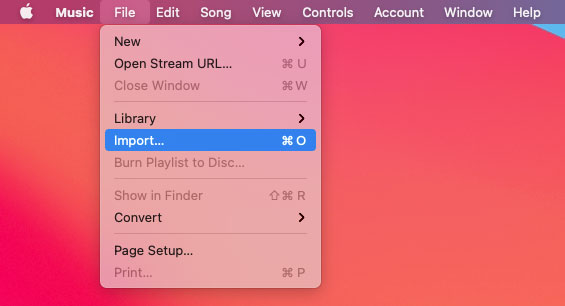
For macOS Catalina 10.15 or later, launch the Music app and click menu "File" > "Import" to browse the output folder of Spotify Music Converter, select the output files and add them to Music app.
Step 6: Transfer Songs to iPhone/iPad & Use in Clips App
Use a USB cable to connect your iPhone, iPad or iPod Touch to your computer, create a playlist in iTunes or Music app, add the output files of converted Spotify songs in your iTunes/Music library, then sync the playlist to your iDevice. Now you can use your favorite Spotify songs as background music in the Clips app.
Of course, the converted songs added to your iPhone/iPad music app can be added to various video editing apps conveniently without any problem. If you are using both Clips app and Spotify on iPhone/iPad, please do not hesitate to download TuneKeep Spotify Music Converter to have a try.